Fussy Cut Fabric Brooch Tutorial
- Banjoflannel
- Dec 5, 2024
- 7 min read
Updated: Feb 14
We love our fabric! Don't you wish you could keep a little of it with you where ever you go?
This fussy cut fabric brooch tutorial will show you how to transform your favorite fabrics into a brooch that can be pinned anywhere and spread cheer everywhere!
It's a great way to use your fabric scraps and I can't think of anyone that wouldn't love to receive one of these gems as a gift.
Prefer to just buy a fussy cut brooch? I have lots of options in my Etsy Shop.
This sewing project focuses on fussy cutting but you certainly can use whatever fabric pieces you like. Fussy cutting is a technique where instead of using the fabric as a whole, you are going to pick and choose which unique pattern motifs to cut out and use. You're going to be FUSSY.
This tutorial uses fabric from Courtney Cerruti's "Long Distance" collection designed for Anna Marie Horner's Conservatory collection for Free Spirit Fabrics. There's so many cute fabrics out there perfect for fussy cutting!
✨Share your make with the hashtag #fussycutbrooch and tag @banjoflannel ✨
Supplies
Fabric with fussy cutting motifs
Embroidery floss or weight 10 crochet thread in a coordinating color for hand stitching
Coordinating quilting cotton weight fabric for background of brooch
Muslin or other coordinating fabric for backing of brooch
Lite Steam-A-Seam 2 or any double-sided fusible for applique
Hand sewing thread (choose any color because it won't be seen when finished)
1'' long pin backs
Glue gun + glue sticks
Pellon Peltex 70
Fabric scissors + non-fabric scissors
Small quilter's ruler
Hand sewing needle
Fabric marking pen/pencil
Iron + ironing surface
Sewing Machine
Sewing machine thread + bobbin in coordinating color to the fussy cut applique
Assemble the Body
Choose a fabric with motifs that are no larger than 1 1/2'' square. You can go larger, but then the cuteness is reduced exponentially! (not verified)
Cut a 2'' x 2'' piece of your double sided fusible, peel off the first side and adhere it to the WS of the motif to fussy cut. Center it as best as you can. Lightly iron from the RS to secure.
Cut out the fussy cut piece around the fusible.
Mark approximately 1/4'' to the top, bottom, left and right of the motif. We want enough space around the edge to sew and not get too close to the motif. I'm using a ruler, but it could also be eyeballed. (I just got a new ruler so I wanted to show it off) Make sure your marks are within the borders of the fusible on the WS.
Connect the dots and sketch a rough rounded shape around the motif with your fabric pen/pencil.
Carefully cut out the shape. I usually use my non-fabric scissors anytime I cutting fabric that has been fused to the double-sided fusible.
Place the fussy cut piece on top of the Peltex 70. Sketch around the piece about 1/4'' from the edge. This will give us enough space to add some hand stitching later.
Cut out the Peltex shape. The side that will be towards the front of the brooch is the RS. Place it RS down on the WS of your coordinating background fabric. This orientation is especially important if your piece is asymmetrical.
Sketch around the Peltex about 1/2'' from the edge and cut out the background fabric shape. The cut doesn't have to be exact, this edge won't be seen when finished.
Thread the hand sewing needle with thread (double strand) and knot at the end.
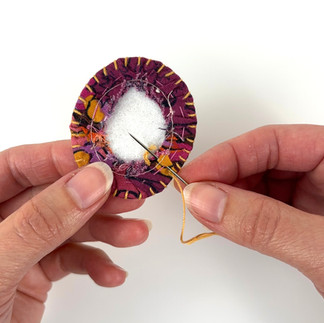
With the background fabric shape WS up, insert needle RS to WS and baste around the edge. Keep the stitches within 1/4'' of the edge, and the stitch length about 1/4'' or less. Shorter basting stitches will help create a finer curve around the Peltex piece. End with the needle coming out from the RS.
Center the Peltex piece on the background shape. Make sure it's orientation is correct if your fabric is directional. Gently pull on the basting thread to gather the fabric around the shape. It's ok if the curve is a little chunky, the hand stitching around the edge will help mask it!
Keeping the thread taut, knot the end and trim thread. Click here for a tutorial on how I typically knot my hand sewing thread. Adjust the gathers to make the smoothest curve you can then press.
Peel off the backing of the applique piece. Center on the background and fuse.
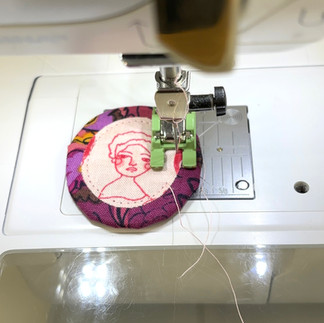
Machine sew around the edge of the fussy cut applique. Keep the stitch length low, less than 3mm and go slow! Move the needle closer to the edge. I like to use an open toed presser foot like the Bernina #20 or #56.
Hand Stitching Embellishment
The hand stitching around the edge is optional but oh doesn't it look nice? Thread the hand sewing needle with at least 24'' of embroidery floss or crochet thread and knot the end (single strand).
We want to hide the knot underneath the backing, so take one stitch closer to the center, just through the fabric on the back and come out about 3/16'' from the edge. These stitches will be about 3/16'' long and 3/16'' apart.
Employ a whip-stitch around the edge of the brooch. Come around to the front and insert the needle 3/16'' from the edge, creating a stitch that is perpendicular to the edge. BUT, as you insert the needle, angle it towards the next stitch position. The needle will come out 3/16'' to the left (or right depending on your handedness) of the first stitch. Wrap to the front and insert needle 3/16'' from edge and angle needle to the next stitch. Repeat these steps until the entire piece is hand stitched around the edge. As you get towards the end, try to space your stitches so they still remain visually even. About 1/2'' from the end I typically draw the last stitches so I can be sure they will be equidistant from each other.
End with the thread coming out the back. Again, we want to hide the knot. So, take another stitch towards the center of the piece and then knot the thread.
*Check out my tutorial on how I make my super fantastic knots...
Make the Backing
Place the entire piece on the Peltex again and trace around it. Cut out the shape 3/8'' to the inside of the line. We want the backing to be smaller than the brooch, but still covering our basting stitches. Place it on the back of the brooch to see how it fits. Trim it up more if needed.
Place the Peltex backing on the muslin (or coordinating fabric for the back). Sketch a 1/2'' border around the Peltex and cut out. Precision is not important here, the edges won't be seen when finished.
Repeat the hand basting steps from the "Assembling the Body" section.
Center the pin back on the RS of the backing you just made. Mark within the holes of the pin so you can make sure your pin stays in the correct position.
Apply a tiny dot of hot glue to the center of the pin back and adhere to the brooch backing. You don't want so much glue that it obstructs the pin holes. It makes the hand sewing in the next step MUCH easier!
UPDATE: I now add a little more hot glue, and it DOES obstruct the holes, on purpose! The glue itself is now enough to keep the pin back in place. But, I still add stitching for reinforcement at the ends of the pin. This is much faster, but the previous instruction still works as well.

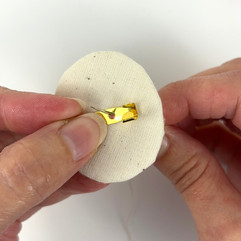
Hand sew the pin back onto the backing. There may be a preferred method for doing this, but this is what I did...I stitched through one hole to one side, came up through the hole again and stitched to the other side. Repeated this 3-4 times, then stitched from outer edge to outer edge another 3-4 times. Then, I repeated these steps for the other pin hole. Does the pin back move a lot when you jostle it? No? Good!
Final Assembly
NOW comes the part where we give ourselves a break. We're not going to hand sew the backing onto the brooch...we're going to hot glue it! Do a dry run and center the backing onto the brooch back to make sure the pin back is oriented correctly according to the front.
Apply an approximate dime sized area of glue to the center of the brooch back and quickly press the backing on top. Once that has cooled and is secure, lift the edges of the backing and apply small amounts of glue. Do a little at a time and press together well with your finger. Try not to put so much that there's excess glue squished out. But even if it does, just pull it away once the glue has cooled some.
Update: I now quickly apply hot glue around the edge of the backside of the backing (opposite side of the pin back, not too close to the edge) and one small dollop in the center. Then I smush the brooch and backing together. I find that this is a faster and cleaner method.
You're finished! Enjoy your new piece of art
Don't forget to share your makes on social media!
I would love to see and share them.
Use the hashtag #fussycutbrooch and tag me @banjoflannel

My typical knotting method for hand sewing thread
When I'm ready to knot I take one more tiny stitch and before pulling the needle completely through, hold the point where the needle emerges from the fabric with your non-dominant thumb. Wrap the thread around the needle 2-3 times around the left side to the back. Pull the thread down towards the bottom of the needle so all the wraps are pushed together. Now your non-dominant hand is also holding the thread wraps in place while you pull the needle all the way through the fabric. Pull the thread until it won't go further and the wraps become the knot. Scratch at the knot towards the fabric to tighten, then snip the excess thread!
Thank you for reading this post. For all the Banjoflannel news scroll down and subscribe to the Knot-Rollers Newsletter!


