Tiny Duffle can't be stopped, the cuteness is unbearable...
I incorporate my Patchwork Sashiko textiles into all of my sewing patterns and the Tiny Duffle Pattern is no exception. It's adorable as is, but add a Patchwork Sashiko textile and the wow-factor increases exponentially! (I don't have data for this.) Slow-stitching, is there anything you can't do?
BUT, the issue is that the Patchwork Sashiko kits create a specific sized textile that is a liiiiittle too small for the Tiny Duffle template. Don't worry! We can fix this! Follow along below to see how to use your Patchwork Sashiko textile to make the Tiny Duffle pattern.
The finished textile created from the Patchwork Sashiko Kits is typically about 7" x 8.5". The starting size is 7"x9" but the hand-stitching causes shrinkage. You can use this method with any size Patchwork Sashiko (PS) textile as long as it is at least 5" x 8.5". Preferably with hand-stitching parallel to the long edge.
Cut PS textile to a width of 5". Measure from one side to maximize the size of the left-over scrap! Make sure your cut lines are parallel to the hand-stitching.
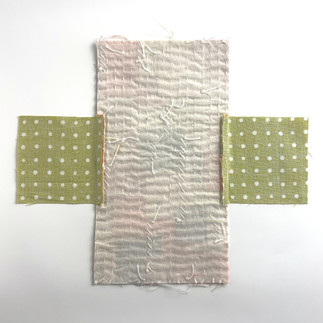
Cut (2) 3"x3" pieces of coordinating quilting cotton for the side flap pieces.
Mark center of the PS textile long edges on the RS. Mark center of the side pieces on the WS. I like using Frixion pens because they are easy to remove. The Clover Chaco Liner in White works well on dark fabrics.
Line up the center marks, side piece and textile RS together. Pin and repeat on other side.
Sew a 1/4" seam. It's ok to sew past the edge a little, just make sure you've sewn some locking/backstitching at the end.
Draw a line that matches the seam from top to bottom (1/4" from the edge). Cut the PS textile on these lines so that the edge lines up with the sewn line.
Press seam towards the PS textile. Make sure this stays pressed toward the PS textile when you fuse the body to the foam.
Lay template on top of the WS, lining up corners with seam corners. You may have a little excess in places other than the round side flaps. Trace around the template and cut.
Continue with Tiny Duffle Pattern instructions! NOTE: The Patchwork Sashiko textile will extend a little past the "edge" of the bottom when Tiny Duffle is complete. It's not a mistake!
Have a project you made with my patterns? Share it and tag me! @banjoflannel
Scroll down to subscribe to my newsletter for my latest posts, projects and exclusive discounts! 👇


Comments